

- Audio-Driven Video Generation: Transforms static images and audio into synchronized videos
- Cinematic-Grade Quality: Generates film-quality videos with natural expressions and movements
- Minute-Level Generation: Supports long-form video creation
- Multi-Format Support: Works with full-body and half-body characters
- Enhanced Motion Control: Generates actions and environments from text instructions
Wan2.2 S2V ComfyUI Native Workflow
Wan2.2-S2V Audio-Driven Video Generation
Transform static images and audio into dynamic videos with perfect synchronization and minute-level generation.
Run on Comfy Cloud
Open in Comfy Cloud
Download Workflow
Download JSON or search “Wan2.2 S2V” in Template Library
video_wan2_2_14B_s2v_reference_image.jpg
LoadImage node 52 · video_wan2_2_14B_s2v_reference_image.jpgvideo_wan2_2_14B_s2v_input_audio.MP3
LoadAudio node 58 · video_wan2_2_14B_s2v_input_audio.MP3
2. Model Links
You can find the models in our repo diffusion_modelswan2.2_s2v_14B_fp8_scaled.safetensors
FP8 scaled diffusion model. Place in
ComfyUI/models/diffusion_models/wan2.2_s2v_14B_bf16.safetensors
BF16 diffusion model. Place in
ComfyUI/models/diffusion_models/wav2vec2_large_english_fp16.safetensors
Audio encoder model. Place in
ComfyUI/models/audio_encoders/wan_2.1_vae.safetensors
Wan2.1 VAE model. Place in
ComfyUI/models/vae/umt5_xxl_fp8_e4m3fn_scaled.safetensors
FP8 scaled text encoder. Place in
ComfyUI/models/text_encoders/3. Workflow Instructions
3.1 About Lightning LoRA
3.2 About fp8_scaled and bf16 Models
You can find both models here:wan2.2_s2v_14B_fp8_scaled.safetensors
FP8 scaled diffusion model
wan2.2_s2v_14B_bf16.safetensors
BF16 diffusion model
wan2.2_s2v_14B_fp8_scaled.safetensors, which requires less VRAM. But you can try wan2.2_s2v_14B_bf16.safetensors to reduce quality degradation.
3.3 Step-by-Step Operation Instructions
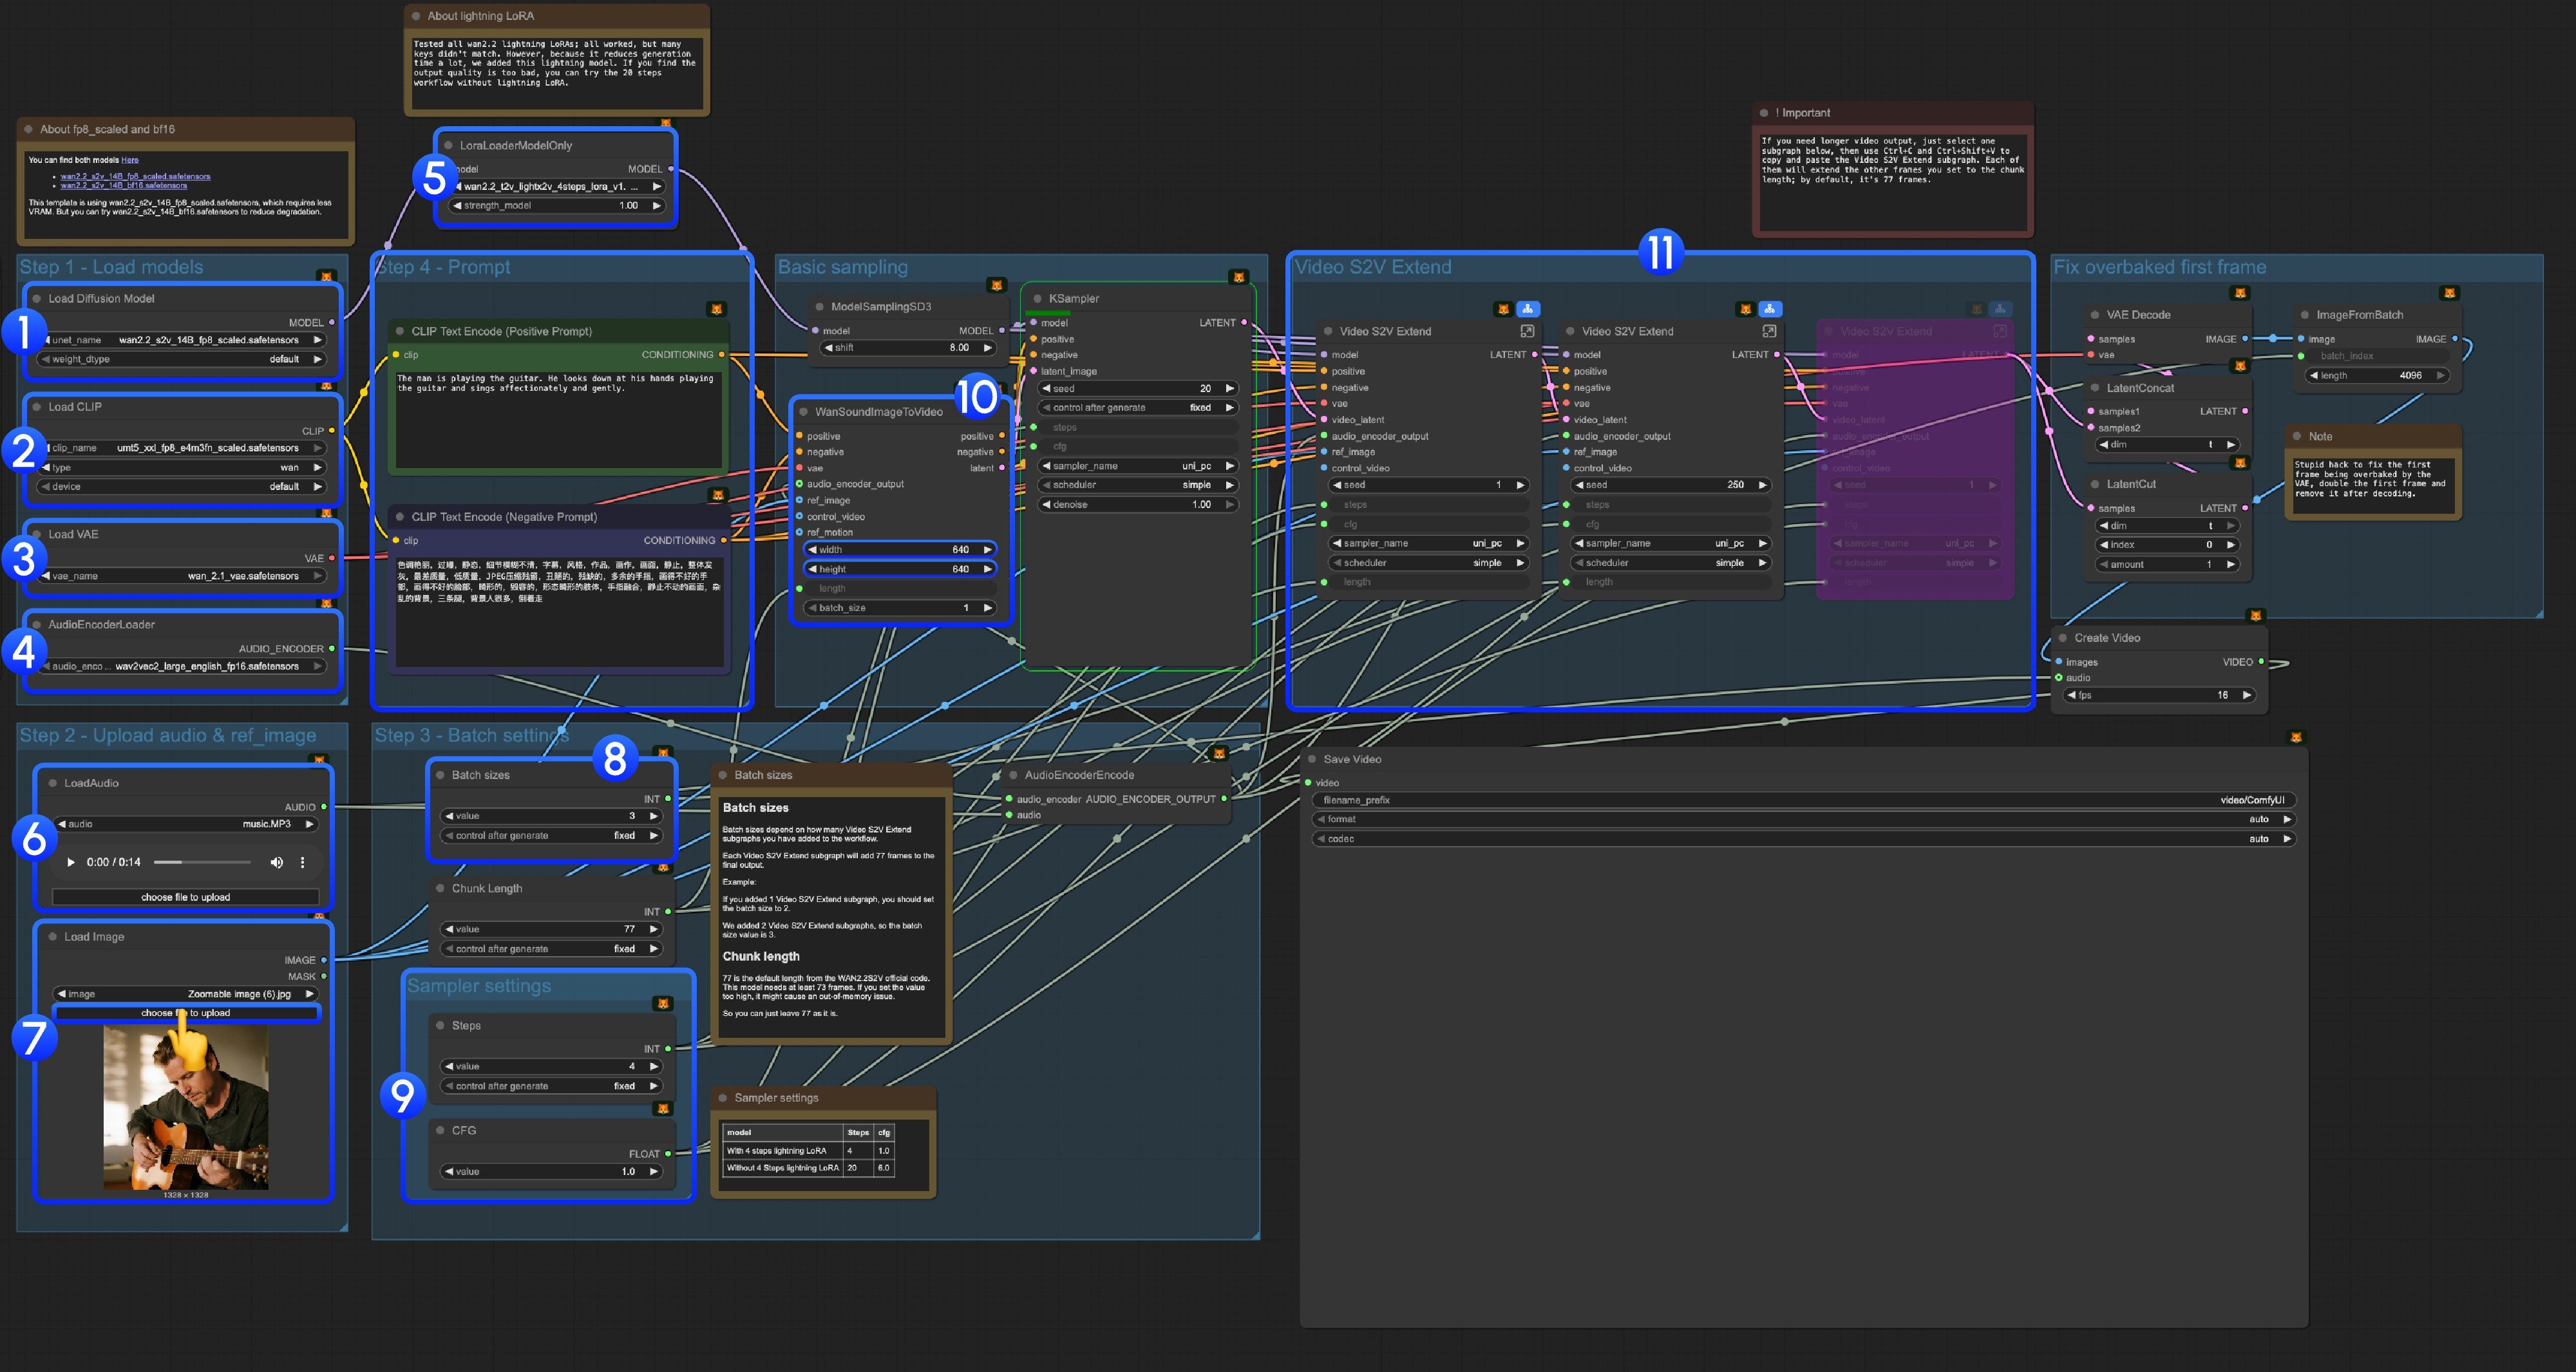
Step 1: Load Models-
Load Diffusion Model: Load
wan2.2_s2v_14B_fp8_scaled.safetensorsorwan2.2_s2v_14B_bf16.safetensors- The provided workflow uses
wan2.2_s2v_14B_fp8_scaled.safetensors, which requires less VRAM - But you can try
wan2.2_s2v_14B_bf16.safetensorsto reduce quality degradation
- The provided workflow uses
-
Load CLIP: Load
umt5_xxl_fp8_e4m3fn_scaled.safetensors -
Load VAE: Load
wan_2.1_vae.safetensors -
AudioEncoderLoader: Load
wav2vec2_large_english_fp16.safetensors -
LoraLoaderModelOnly: Load
wan2.2_t2v_lightx2v_4steps_lora_v1.1_high_noise.safetensors(Lightning LoRA)- We tested all wan2.2 lightning LoRAs. Since this is not a LoRA specifically trained for Wan2.2 S2V, many key values don’t match, but we added it because it significantly reduces generation time. We will continue to optimize this template
- Using it will cause significant dynamic and quality loss
- If you find the output quality too poor, you can try the original 20-step workflow
- LoadAudio: Upload our provided audio file or your own audio
- Load Image: Upload reference image
-
Batch sizes: Set according to the number of Video S2V Extend subgraph nodes you add
- Each Video S2V Extend subgraph adds 77 frames to the final output
- For example: If you added 2 Video S2V Extend subgraphs, the batch size should be 3, which means the total number of sampling iterations
- Chunk Length: Keep the default value of 77
-
Sampler Settings: Choose different settings based on whether you use Lightning LoRA
- With 4-step Lightning LoRA: steps: 4, cfg: 1.0
- Without 4-step Lightning LoRA: steps: 20, cfg: 6.0
- Size Settings: Set the output video dimensions
-
Video S2V Extend: Video extension subgraph nodes. Since our default frames per sampling is 77, and this is a 16fps model, each extension will generate 77 / 16 = 4.8125 seconds of video
- You need some calculation to match the number of video extension subgraph nodes with the input audio length. For example: If input audio is 14s, the total frames needed are 14x16=224, each video extension is 77 frames, so you need 224/77 = 2.9, rounded up to 3 video extension subgraph nodes
- Use Ctrl-Enter or click the Run button to execute the workflow